Join Easy-Forex, THE site for forex trading. Best Website for hosting
Download Forex Joe's Free Book
You Know Free Practice Trading Account,Trading Forex A currency trade is the simultaneous buying of one currency and selling of another one. The currency combination used in the trade is called a cross (for example, the euro/US dollar, or the GB pound/Japanese yen.). The most commonly traded currencies are the so-called "majors" – EURUSD, USDJPY, USDCHF and GBPUSD.
Showing posts with label H - Image. Show all posts

Make thumbnail for related posts

You may know the code for related posts which I showed in previous post in Simplex Design blog. In this post ,I want to show you the code for adding thumbnail to related posts . This code is based on related posts code before but add some lines for thumbnail . I myself don't create this code ,I found it in Bloggerpluggins blog,and introduce it here ,I hope it helpful for you all .


You can take a look on related post with thumbnails at live demo


Here is steps for doing this hack :

1,Go to Dashboard ,continue to Layout --> Edit HTML .Checked on Expand Widgets template .


2,Look for  </head>

and replace it with :


<!--Related Posts with thumbnails Scripts and Styles Start-->

<!-- remove --><b:if cond='data:blog.pageType == &quot;item&quot;'>

<style type="text/css">

#related-posts {


float:center;

text-transform:none;

height:100%;

min-height:100%;

padding-top:5px;

padding-left:5px;

}


#related-posts h2{


font-size: 1.6em;

font-weight: bold;

color: black;

font-family: Georgia, &#8220;Times New Roman&#8221;, Times, serif;

margin-bottom: 0.75em;

margin-top: 0em;

padding-top: 0em;

}


#related-posts a{

color:black;

}

#related-posts a:hover{

color:black;

}


#related-posts  a:hover {


background-color:#d4eaf2;

}

</style>

<script type='text/javascript'>

var defaultnoimage="https://blogger.googleusercontent.com/img/b/R29vZ2xl/AVvXsEju4PMfrz8SVz72CEf3iyqExNSX__huAamArNkbJVc3TxF1j5g6n9BqI4-Ipa8wBEi7VRSW1MpFuI8UAjVfH0WTbvCToAG1wDEWRXXt3c5Y0KpQ1VnB-QbWVQfVNEiA4QdTrpSvKoMSQFY/s400/noimage.png";

var maxresults=5;

var splittercolor="#d4eaf2";

var relatedpoststitle="Related Posts";

</script>


<script src='http://blogergadgets.googlecode.com/files/related-posts-with-thumbnails-for-blogger-pro.js' type='text/javascript'/>

<!-- remove --></b:if>

<!--Related Posts with thumbnails Scripts and Styles End-->

</head>

This is CSS for formatting related posts section .

3,Find <div class='post-footer-line post-footer-line-1'>

or <p class='post-footer-line post-footer-line-1'>


if you don't find any of two lines above in templates ( for example ,in template I designed ^^) you can find this <p><data:post.body/></p>

and add the code below after these line :

<!-- Related Posts with Thumbnails Code Start-->

<!-- remove --><b:if cond='data:blog.pageType == &quot;item&quot;'>

<div id='related-posts'>

<b:loop values='data:post.labels' var='label'>


<b:if cond='data:label.isLast != &quot;true&quot;'>

</b:if>

<script expr:src='&quot;/feeds/posts/default/-/&quot; + data:label.name + &quot;?alt=json-in-script&amp;callback=related_results_labels_thumbs&amp;max-results=6&quot;' type='text/javascript'/></b:loop>

<script type='text/javascript'>


removeRelatedDuplicates_thumbs();

printRelatedLabels_thumbs(&quot;<data:post.url/>&quot;);

</script>

</div><div style='clear:both'/>

<!-- remove --></b:if>

<!-- Related Posts with Thumbnails Code End-->


There are some variables in this code and you can change its value for making related posts section as you want .


var maxresults=5;
the number of related post which will be show


var relatedpoststitle="Related Posts";
title of related posts section

var defaultnoimage="https://blogger.googleusercontent.com/img/b/R29vZ2xl/AVvXsEju4PMfrz8SVz72CEf3iyqExNSX__huAamArNkbJVc3TxF1j5g6n9BqI4-Ipa8wBEi7VRSW1MpFuI8UAjVfH0WTbvCToAG1wDEWRXXt3c5Y0KpQ1VnB-QbWVQfVNEiA4QdTrpSvKoMSQFY/s400/noimage.png";
url of default image if it can't create thumbnail


var splittercolor="#d4eaf2";
color of splitter line .

4,Save your template and you are done .

Recent Posts Widget for Blogger with Thumbnails and much more..


Domo?
Recent Posts widget For Blogger [With thumbnails and lots more].
This is the first widget of it kind. Actually i made this for the new blogger gadget directory.
1) Like many other recent posts widgets this one also displays your recent posts with summaries comment numbers etc..but yea with a greater degree of customization

2) Image thumnails - Many of you might not have heard of MediaThumbnails. When you add some image to blogger,blogger automatically generates a thumbnail image of a small size 75 x 75. You wont see this small image anywhere but we are using this small sized images for post thumbnails.As i said this is somthing unique.All the recent post widgets till now(till the time i made this post lolz..) uses the original big images and scales them down using css.This means that your computer will have to fetch all of those big images.But with this widget we are fetching the media thumbnails.The media thumbnails as i said are of small resolution and hence very less size(somehere between 1kb-10kb)
The advantage of using media thumbnail is that out widget will load much much much faster than the other ones available till now.

3)You can display the recent posts of any blogger blog on your sidebar using this widget(display is not limited to your blogposts alone)

4)Highly customizable. (you can understand that when you actually install it.. :)

5)This is all that i have to say about the widget.. You can checkout more of its features by intsalling it onto your blog..Actually i now feel that it has too many options.. ;)

<style>img.recent_thumb {padding:1px;width:55px;height:55px;border:0;
float:right;margin:0 0 5px 10px;}.recent_posts_with_thumbs {float: left;width:
100%;min-height: 70px;margin: 5px 0px 5px 0px;padding: 0;font-size:12px;}ul.recent_posts_with_thumbs
li {padding-bottom:5px;padding-top:5px;min-height:65px;}.recent_posts_with_thumbs
a {text-decoration:none;}.recent_posts_with_thumbs strong {font-size:10px;}.clearfix
{ margin: 0 5px 0 5px;

padding: 0 5px 0 10px;

background:#0066FF;

border:1px solid #404548;

overflow: hidden;

height:60px;

}

.clearfix a {

color:#fff;

}

.clearfix:hover {

background:#FF0099;

border:1px solid #404548;

}</style><script style="text/javascript" src="http://bloggerplugins.org/scripts/recentpostswiththumbs.js"></script><script
style="text/javascript">var numposts = 5;var
showpostthumbnails = true;var displaymore = true;var displayseparator = true;var
showcommentnum = true;var showpostdate = true;var showpostsummary = true;var
numchars = 100;</script><script src="http://YOURBLOG.blogspot.com/feeds/posts/default?orderby=published&alt=json-in-script&callback=showrecentpostswiththumbs"></script><span
style="float:right;font-size: 80%">Powered by <a href="http://yuljet.blogspot.com/2009/07/recent-posts-widget-for-blogger-with.html"
target="_blank">Blogger Widgets </a></span>

<noscript><br/><a href="http://yuljet.blogspot.com/2009/07/recent-posts-widget-for-blogger-with.html"
target="_blank">Recent Posts Widget</a>

</noscript>

Comments From, Comments Wordpress form for Blogger, js-kit comments


Connect your blog to the most popular social networks. Each comment becomes a call to action for thousands of friends to come check out your content.
it Look like this:


How to Install


  1. Log in to your blogger account and navigate to Layout section. Now go to the edit HTML subtab.

  2. Next,check the "expand widget templates" box. Then, Find this word google.setOnLoadCallback(initialize)

  3. You will see like this:
    google.setOnLoadCallback(initialize);
    </script>
    </b:if>
    </b:includable>
    </b:widget>
    </b:section>

  4. then add Code:

  5. <b:widget id='HTML20' locked='false' title='' type='HTML'>
    <b:includable id='main'>
    <style type='text/css'>.jskit-hidden, #comments{display: none;}</style>
    <script type='text/javascript'>var JSKitComments = {&#39;pageType&#39;: &#39;<data:blog.pageType/>&#39;, &#39;blogUrl&#39;: &#39;<data:blog.homepageUrl/>&#39;};</script>
    <h2 class='title'><data:title/></h2>
    <data:content/>
    <div class='jskit-hidden blog-admin' id='jskit-comments-content'/>
    <script type='text/javascript'>document.getElementById(&#39;jskit-comments-content&#39;).parentNode.style.display = &#39;none&#39;;</script>
    <script src='http://js-kit.com/extra/blogger/comments.js' type='text/javascript'/>
    <b:include name='quickedit'/>
    </b:includable>
    </b:widget>

  6. Into like this:

  7. google.setOnLoadCallback(initialize);
    </script>
    </b:if>
    </b:includable>
    </b:widget>

    <b:widget id='HTML20' locked='false' title='' type='HTML'>
    <b:includable id='main'>
    <style type='text/css'>.jskit-hidden, #comments{display: none;}</style>
    <script type='text/javascript'>var JSKitComments = {&#39;pageType&#39;: &#39;<data:blog.pageType/>&#39;, &#39;blogUrl&#39;: &#39;<data:blog.homepageUrl/>&#39;};</script>
    <h2 class='title'><data:title/></h2>
    <data:content/>
    <div class='jskit-hidden blog-admin' id='jskit-comments-content'/>
    <script type='text/javascript'>document.getElementById(&#39;jskit-comments-content&#39;).parentNode.style.display = &#39;none&#39;;</script>
    <script src='http://js-kit.com/extra/blogger/comments.js' type='text/javascript'/>
    <b:include name='quickedit'/>
    </b:includable>
    </b:widget>


    </b:section>

  8. Save Template

  9. Done!

Recent Post Thumbnails Widget - Blogger Tweak

Did you see recent post with thumbnail? If yes then you definitely want to add in your blog. Yes you can.


Here are step for that.

1. Log in to your Blogger account.
2. Click Layout >> Page Element.
3. Click on Add Gadget and add below code in it.


<script language="JavaScript">

imgr = new Array();

imgr[0] = "http://img195.imageshack.us/img195/7350/blocko.gif";

imgr[1] = "http://img195.imageshack.us/img195/7350/blocko.gif";

imgr[2] = "http://img195.imageshack.us/img195/7350/blocko.gif";

imgr[3] = "http://img195.imageshack.us/img195/7350/blocko.gif";

imgr[4] = "http://img195.imageshack.us/img195/7350/blocko.gif";
showRandomImg = true;

boxwidth = 298;

cellspacing = 8;

borderColor = "#000000";

bgTD = "#000000";

thumbwidth = 40;

thumbheight = 40;

fntsize = 12;

acolor = "#666";

aBold = true;

icon = " ";

text = "comments";

showPostDate = false;

summaryPost = 40;

summaryFontsize = 10;

summaryColor = "#666";

icon2 = " ";

numposts = 7;

home_page = "http://example.blogspot.com/";

</script>

<script src="http://socheate.googlepages.com/recentposts_thumbnail.js" type="text/javascript"></script>


Change green text with your choice of height and width and blue text with your blog name like http://yourname.blogspot.com

4. Move your Widget as your choice and save it. You are done.

What is next to do?


If you didn't subscribe at then do it now. So, you will not loose any update on this blog.

How to resize image in Home Page at Magazine Template R.1.2

Kang Rohman has received complaints several times about Magazine Template R.1.2, it is about the image in home page that’s displayed with small size.
How can we resize the image in home page of magazine Template magazine R.1.2 ?
If you feel uncomfortable with the image size in home page at magazine Template R.1.2, you can resize it as follow:

Login to blogger with your ID
Click Layout
Click Edit HTML
Find this code :
.post-body img{
max-width:70px;
padding:1px;
float:left;
margin:0 5px 1px 0;
border: 1px solid #cadaef;
}

Focus to the code:
max-width:70px;

Change the pixel with the higher one, suggested to change not more than 300px, e.g.:
max-width:300px;

The code will be as below:
.post-body img{
max-width:300px;
padding:1px;
float:left;
margin:0 5px 1px 0;
border: 1px solid #cadaef;
}

Click Save template
Done
Additional Note:
Max-width means the width of image displayed. It is easy, right?
Happy trying!

How do I put a picture into the caption of a picture on Website

(With Caption)នៅ​ក្រោម​លំនៅ​ឋាន​មាន​កី​តម្បាញ​សំរាប់​ត្បាញ​ហូល​ (រូបថត​ ៖​ ធា)

នៅ ក្រោម លំនៅ ឋាន មាន កី តម្បាញ សំរាប់ ត្បាញ ហូល (រូបថត ៖ ធា)


(No Caption)នៅ​ក្រោម​លំនៅ​ឋាន​មាន​កី​តម្បាញ​សំរាប់​ត្បាញ​ហូល​ (រូបថត​ ៖​ ធា)


A caption to an image on Post is a short text message that appears below the image and clarifies its import. Most captions draw attention to something in the image that is not obvious, such as its relevance to the text. For complex images or images whose relationship to the text is unclear, the caption can be one or two short sentences, rarely three. Writing good captions is difficult, and the examples below may be helpful. Along with the title, the lead, and section headings, captions are the most commonly read words in an article, so they should be succinct and informative.


: search this line ]]></b:skin> and add this CSS code above that line.
.wp-caption {
border: 1px solid #DDDDDD;
text-align: center;
background-color: #EEEEEE;
padding: 4px 0px 5px 0px;
-moz-border-radius: 3px;
-khtml-border-radius: 3px;
-webkit-border-radius: 3px;
border-radius: 3px;
}
.wp-caption img {
margin: 0px 0px 5px 0px;
padding: 0px;
border: 0px;
}
.wp-caption p.wp-caption-text {
margin: 0px;
padding: 0px 0px 0px 0px;
font-size: 11px;
font-weight: normal;
line-height: 12px;
}

When you want to put Photo with Caption you should write like this:

<div class="wp-caption"><img src="http://women.open.org.kh/files/images/hol_phamoung.jpg" alt="" />
<p class="wp-caption-text">Khmer Dress(Photo by:sss)</p>
</div>

How to add comment avatars (author images) to your comments section


A great way to add comment avatars: an image (or icon) which is unique to the person who is making the comment. When using comment avatars in your blog, you will easily be able to recognize comment authors, especially those who regularly visit your blog. Also I feel this adds a greater sense of interaction between blog authors and their readers.


By default, Blogger only shows comment avatars on comment pages (either pop-up or full screen, depending on your comment settings). However, no comment avatars appear in the most visually important place: in your item pages where comments are displayed beneath your posts. Additionally, only the comment avatars of registered Blogger users may appear on these pages, so if your readers blog on a different blogging platform, their avatar cannot appear at all.

how to put Picture or Flash to your head Blog

how to put Flash or Picture of your head Blog


Add me to your Sidebar if you want to link me!


Before you add Flash or Picture you must to
មុននឹងអ្នកដាក់វាបាន លុះត្រាតែអ្នក ធ្វើតាមប្រមានចំណុចខាងក្រោមនេះសិន
Add Page Element របៀបបន្ថែមក្បាលទំព័រ first!

When you do already, can you put it like:
នៅពេលដែលអ្នកដាក់រួចហើយ ទើបធ្វើតាមដូចខាងក្រោម៖
How to put Flash:
You can make Flash animation By:

Adobe Flash CS3 Professional

overview

Flashy Effect


and get your get your code:
<object classid="clsid:D27CDB6E-AE6D-11cf-96B8-444553540000" codebase="http://download.macromedia.com/pub/shockwave/cabs/flash/swflash.cab#version=7,0,19,0" title="socheat" height="50" width="150">
<param value="http://socheate.googlepages.com/socheat-blogspot.swf" name="movie">

<param value="high" name="quality">
<embed pluginspage="http://www.macromedia.com/go/getflashplayer" quality="high" src="http://socheate.googlepages.com/socheat-blogspot.swf" type="application/x-shockwave-flash" height="50" width="150"></embed>
</object>

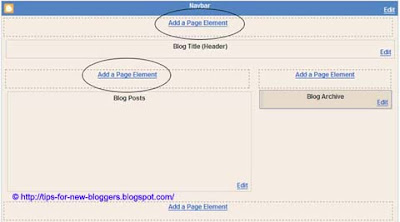
You can change in the red text to your flash, copy this code to the head of your blog by add Add Page Element
Add Page Element to Blogger Header and Blog Posts

Add Java Script, and past the code into it.

How to Add Picture
លោកអ្នកអាចធ្វើរូបភាពតាមរយៈ

Adobe - Photoshop


រួចហើយយកទៅផ្ញើរក្នុងវេបសាយណាមួយ ហើយ សេរសេរកូដ
<img src="http://www.tsemp-c2.org/donation/Background/04.gif">
Then copy this code to the head of your blog by add Add Page Element
Add Page Element to Blogger Header and Blog Posts

Add Java Script, and past the code into it.


Recent Post Thumbnails Widget


Blogger Torturial

Visitor From...

Followers

Copyright © 2009 by Blogger Torturial , Help Blogger , Fixs Blogger, Techlogy today

Join Easy-Forex, THE site for forex trading. Best Website for hosting
Download Forex Joe's Free Book
Template by Blog Templste 4 U | Blogspot Tutorial